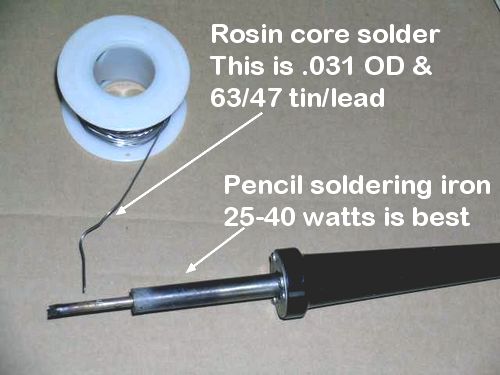
Good soldering starts with the right tools and materials
GOOD SOLDERING TECHNIQUES
CAUTION: Any electric application requires making wire connections. The only dependable and reliable way to do this is by soldering. Solder is a skill, just like gluing. There is a right way and dozens of wrong ways. The wrong way can lead to bad connections that cause a loss of power or fall apart, and the wrong technique or tools can damage or ruin the electrical components. You must use only good quality rosin core solder such as sold at a Radio Shack. You must use a small pencil type iron that is 25 to 40 watts. (Available at low cost from Radio Shack, Big Lots, Harbor Freight, etc.) The typical soldering gun has way too much power and it will damage the parts you will be working with, unless you are really skilled with it. Note: if you are soldering delicate surface mount electronic boards, additional cautions and care are required. The tip of the soldering iron needs to be kept clean and coated with shinny solder. Wipe it with a wet rag when hot, and melt some solder on it. You might need to clean it down to bare metal with steel wool or sandpaper and give it a fresh coat of solder. Many new irons will come with some instructions.
A properly soldered connection will have a shiny appearance, not a dull or glazed look. Solder is used to make a good electrical connection, it is not intended for mechanical strength. The right way is to heat the wire or terminal quickly with the iron and let the solder flow onto it. You want to have the iron hot enough so it will not take long to heat the wire or terminal up to the melting point of the solder. It is bad to leave the iron on the wire or terminal for a long time as this heats up the whole thing, not just what you want to get solder on. Sometimes the extended heat can do damage when getting on and off quickly will not.
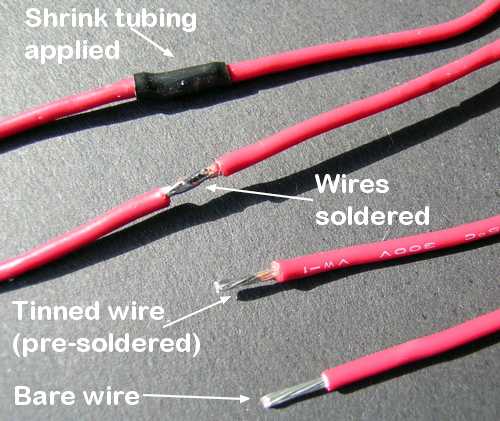
Do not, melt the solder onto the cold wire or terminal. Usually, it is best, to "tin" the item to be soldered in advance. This means you heat the item and let some solder flow onto it. Remove the iron and you should have shiny solder on it. Do this to both items. Then when you join them, the solder from both will flow together, giving a great electrical connection. Remember to hold the items very still while the solder cools or you will get a "cold joint" which is not shiny, looks dull, and does not conduct electricity as well.
Heat shrink tubing is commonly used to insulate bare metal connections. This is particularly good when the bare joints can move around and touch something. The shrink tubing also helps reduce stress on the joint. Such tubing can be found in a variety of sizes at places like Radio Shack and Harbor Freight. It usually shrinks by a factor of two. Use the smallest size that will fit over the joint. You can use a heat gun, your pencil iron, or even a carefully applied butane lighter to shrink it. Practice on some scrap. Things like the terminals on motors, timers and switches do not take kindly to tugging, twisting, and pulling. A dab of epoxy or something applied to the area can help keep wires in place and reduce stress on the terminals.
Good soldering starts with the right tools and materials
Soldering is for making a good electrical connection. It is not a weld for
strength.
The bare wire must be clean and free of oils and dirt before starting or the
solder will not "wet" correctly.
Shrink tubing is not always needed, but it is an insulation for the new
connection and "it looks good".
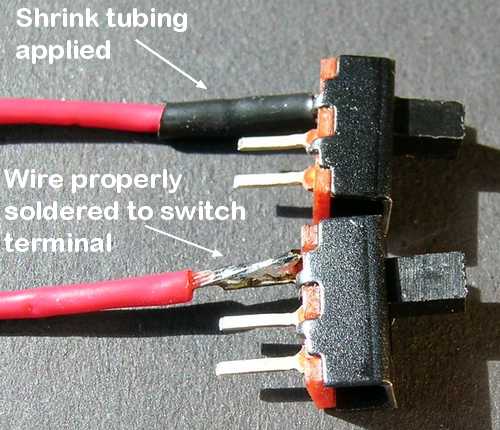
This is our SW-SP switch. The center terminal is the common, and connection is
made to
the top or bottom terminal depending on the position of the switch lever.